

Most organizations would agree that effectively managing tasks and action items is critical for team collaboration and productivity.
Luckily, Microsoft Teams offers built-in features and integrations to streamline assigning, organizing, tracking, and completing shared tasks across your organization. This is great if you’re already using Teams for work meetings.
In this article, we will uncover best practices for getting the most out of Microsoft Teams action items through the Tasks by Planner and To Do app, empowering your teams to achieve maximum efficiency.
What Are Action Items?
Action items refer to concrete next steps or tasks that are assigned to specific individuals coming out of a meeting, project, or other collaborative effort. They represent commitments made during the meeting discussion that drive progress towards goals. Some examples include:
- “Submit a report to [Manager] by [Date]”
- “Reach out to [Client] to schedule a meeting about X”
- “Fix bug X that was identified in testing”
You can create action items either for your own personal use or assign and share them to someone else in your team.
By documenting action items within Microsoft Teams, team members can clarify exactly who is responsible for completing each follow-up task in the same place that meetings are held. This prevents items from falling through the cracks and fosters transparency around workloads and commitments.
Overall, utilizing action items facilitates information sharing, delegation of responsibilities, and accountability to internal and external stakeholders.
Having a hard time with action items because you can’t remember what was discussed in meetings?
Wudpecker automates notetaking for your Teams meetings. It even writes action items for you.
Tasks by Planner and To Do in MS Teams
Microsoft offers a variety of applications for different work life needs. Even just for creating action items or tasks, you have multiple options to choose from.
With the apps listed below, you can assign items to members, set due dates, attach files, mark tasks as complete, and more. All of them are synced to the cloud, so you have the same action items available across all your devices.
- The To Do app is a place for your individual tasks that are only visible to you.
- The Planner app allows teams to collaborate on their shared project action items.
- MS Teams has integrated both of these into one app: “Tasks by Planner and To Do”. You no longer have to use multiple different platforms to access both individual and teamwide action items.
Here’s how to set up Tasks by Planner and To Do so that you can easily find it every time you open Teams.
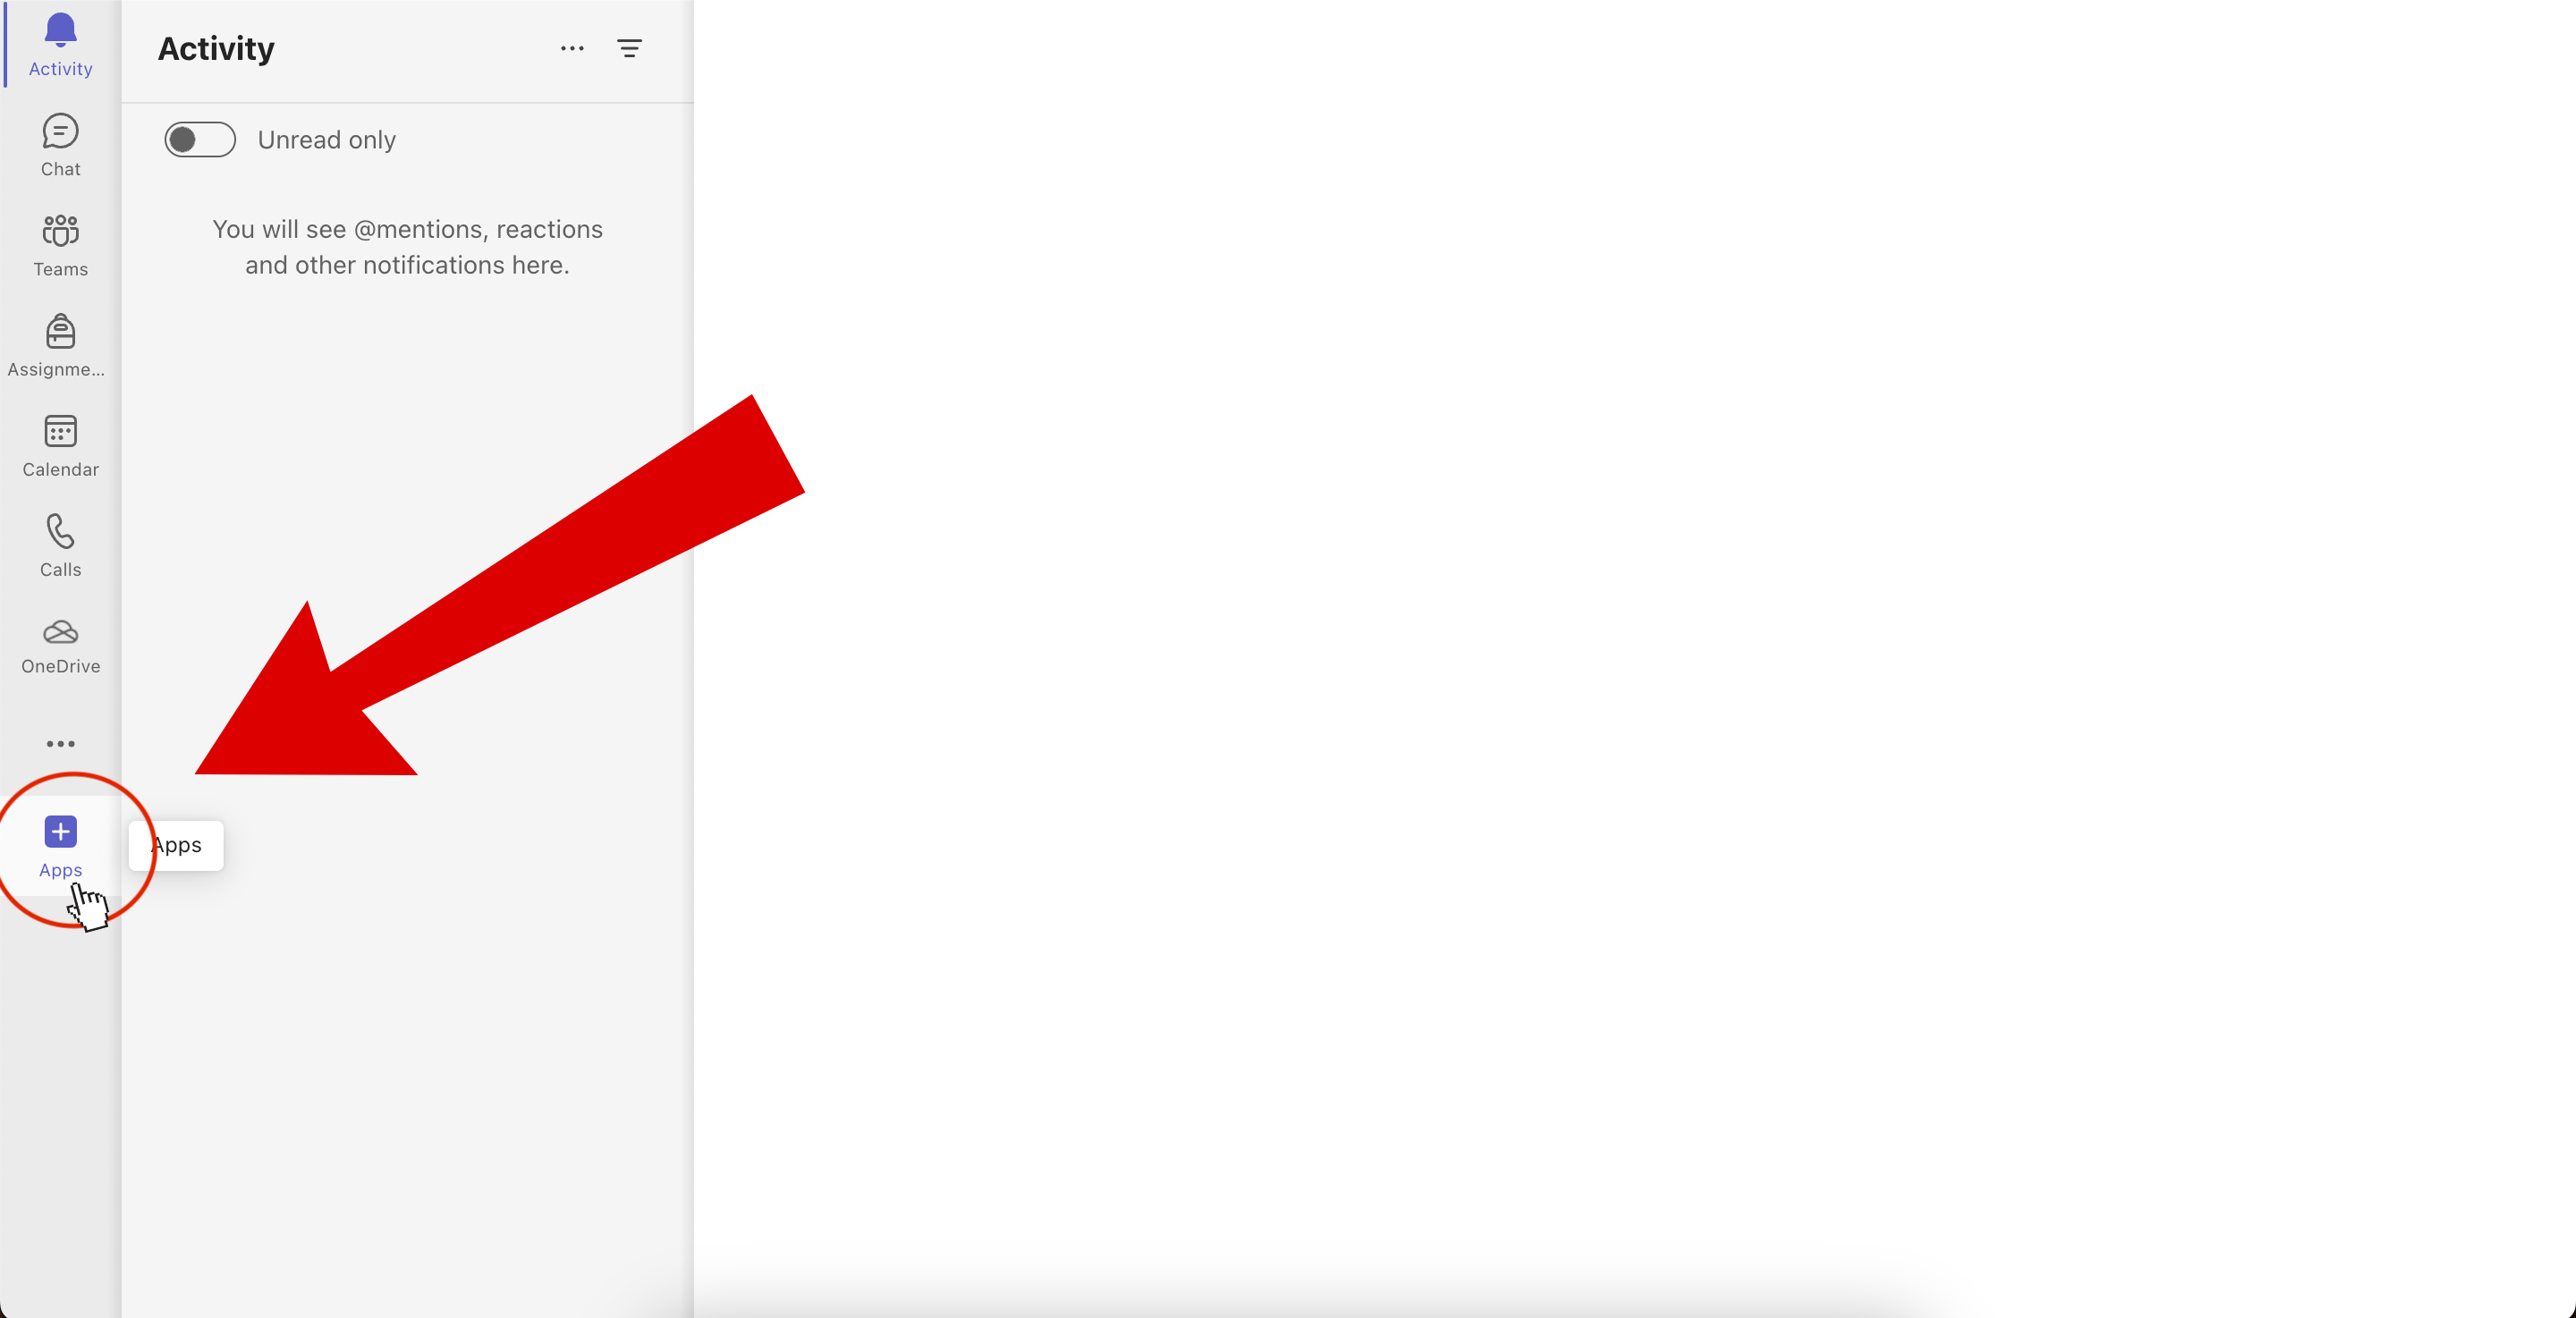
Step 1: Go to the left side menu bar and click “Apps”.
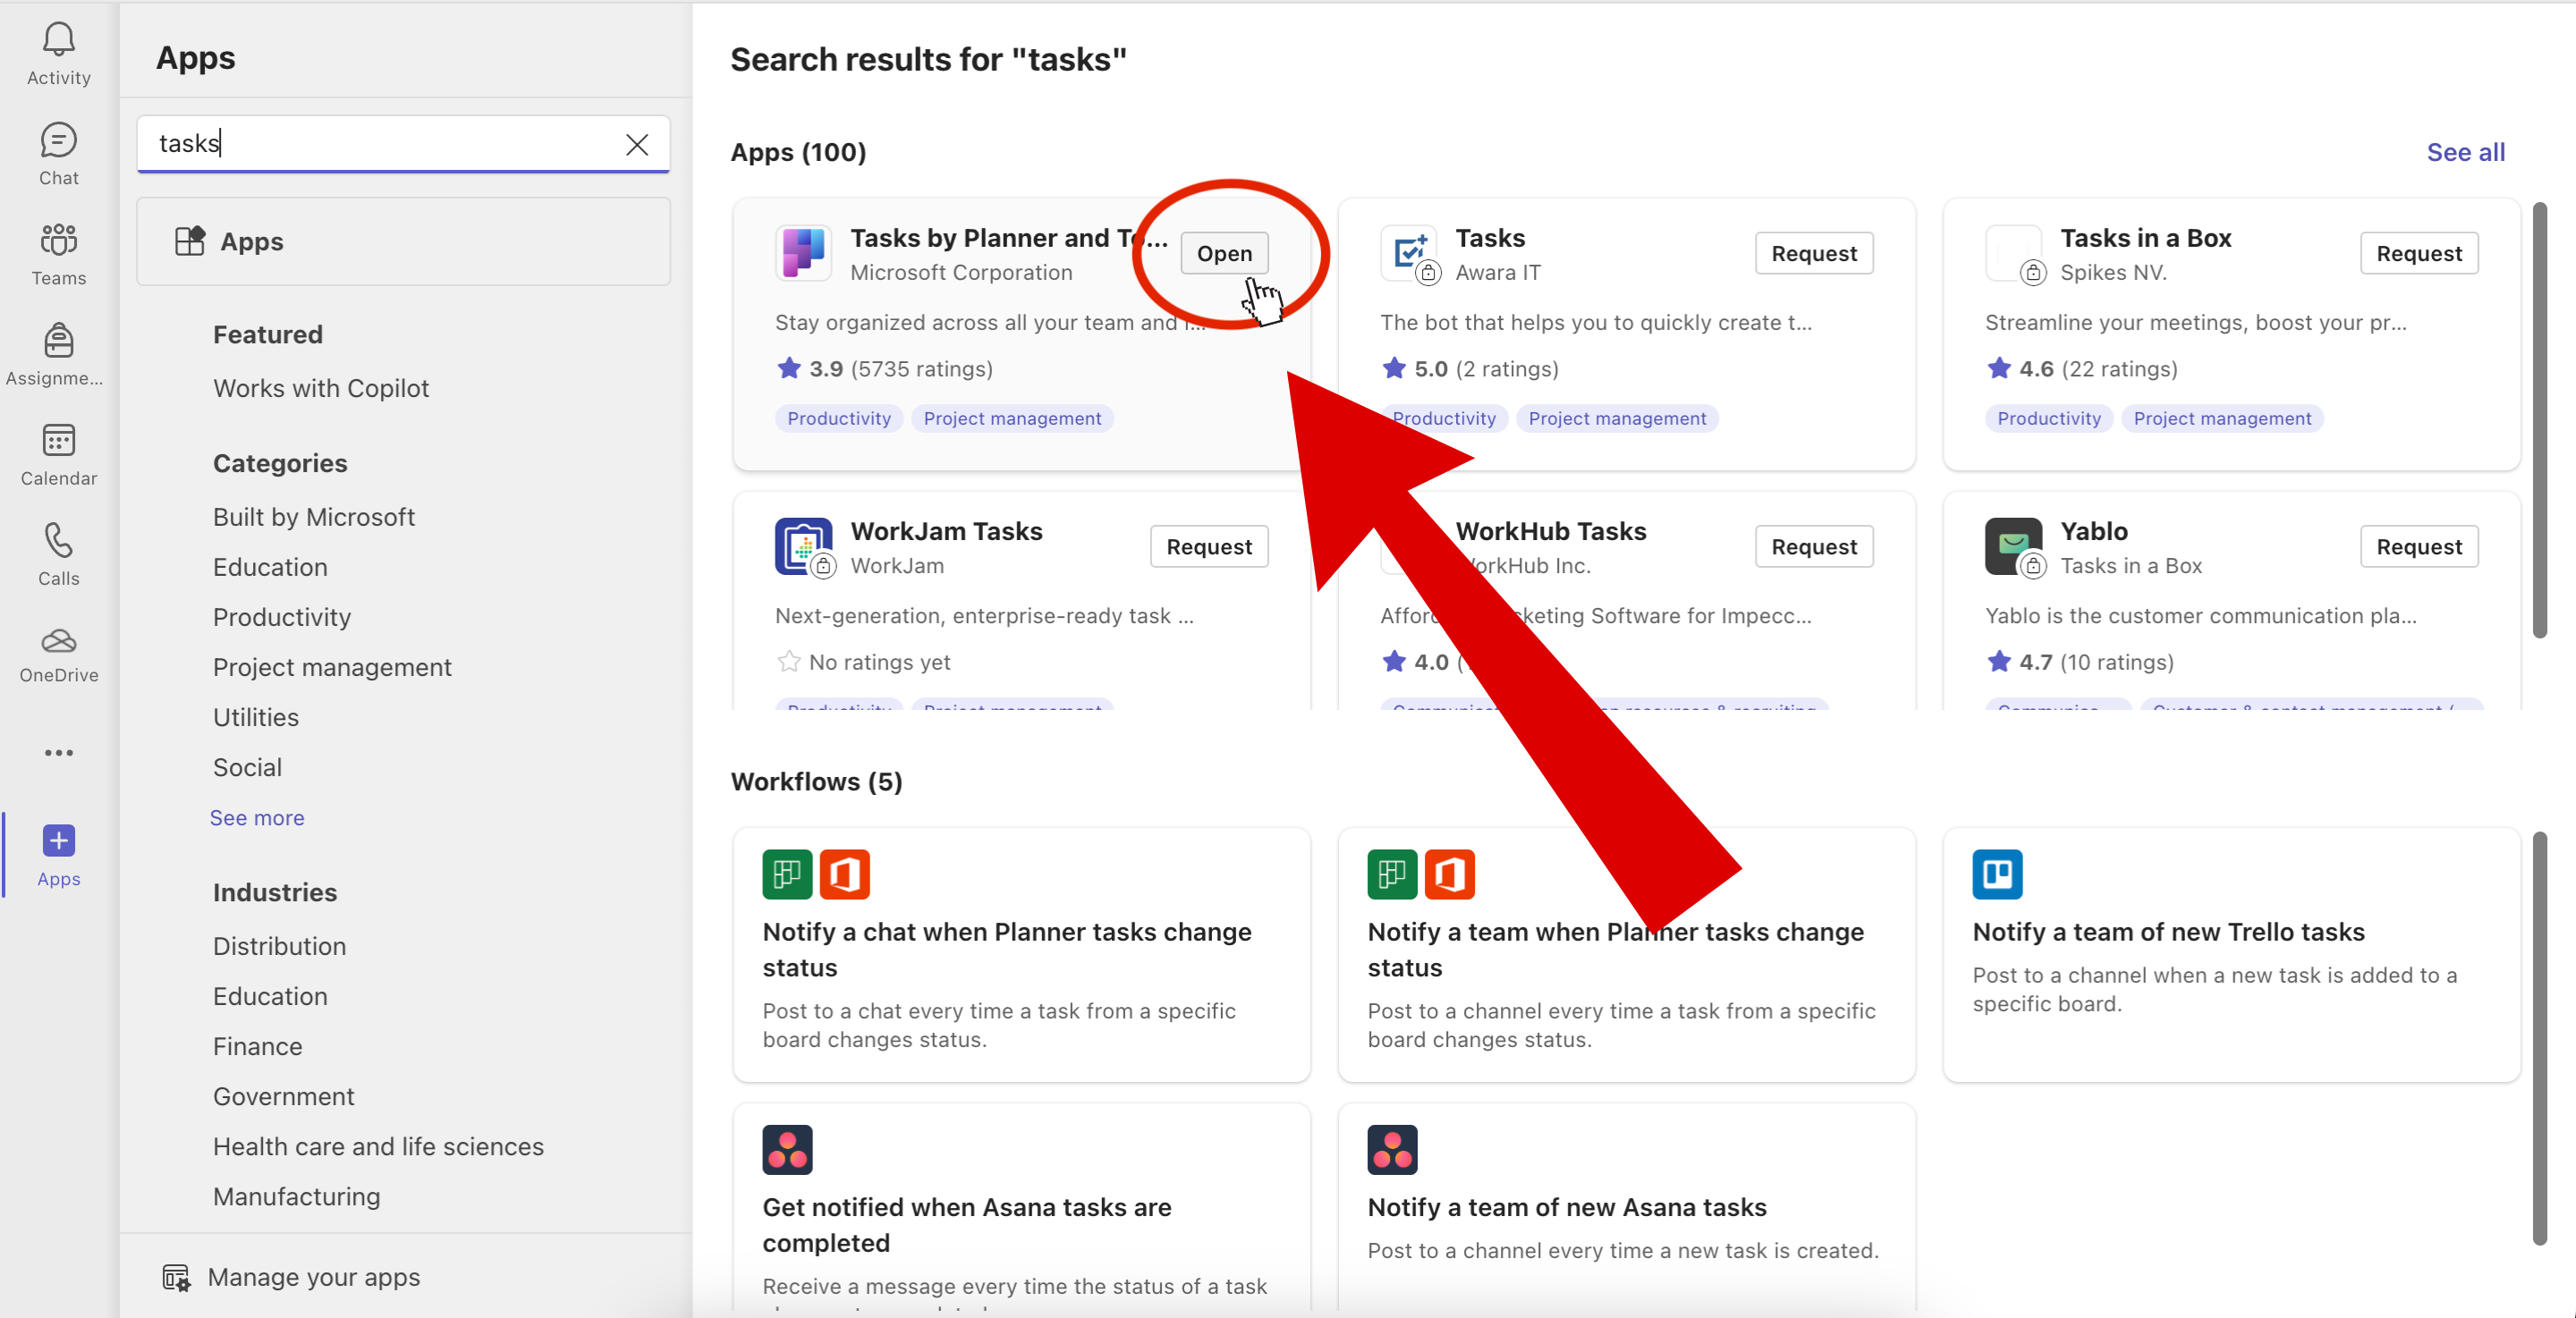
Step 2: Type “tasks” in the search bar. Now you should see search results pop up on the screen. Click “Open” for the “Tasks by Planner and To Do” app.
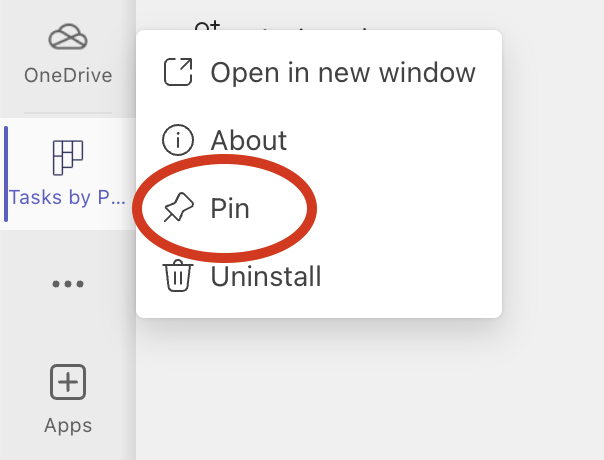
Step 3: Hover over the left side menu again, and right click on the Tasks app. Press “Pin”. From now on, every time you’re using Teams, you can easily access the app from the menu with one click.
Now you’re all set! Let’s see how to actually take advantage of the app’s features next.
Personal Action Items
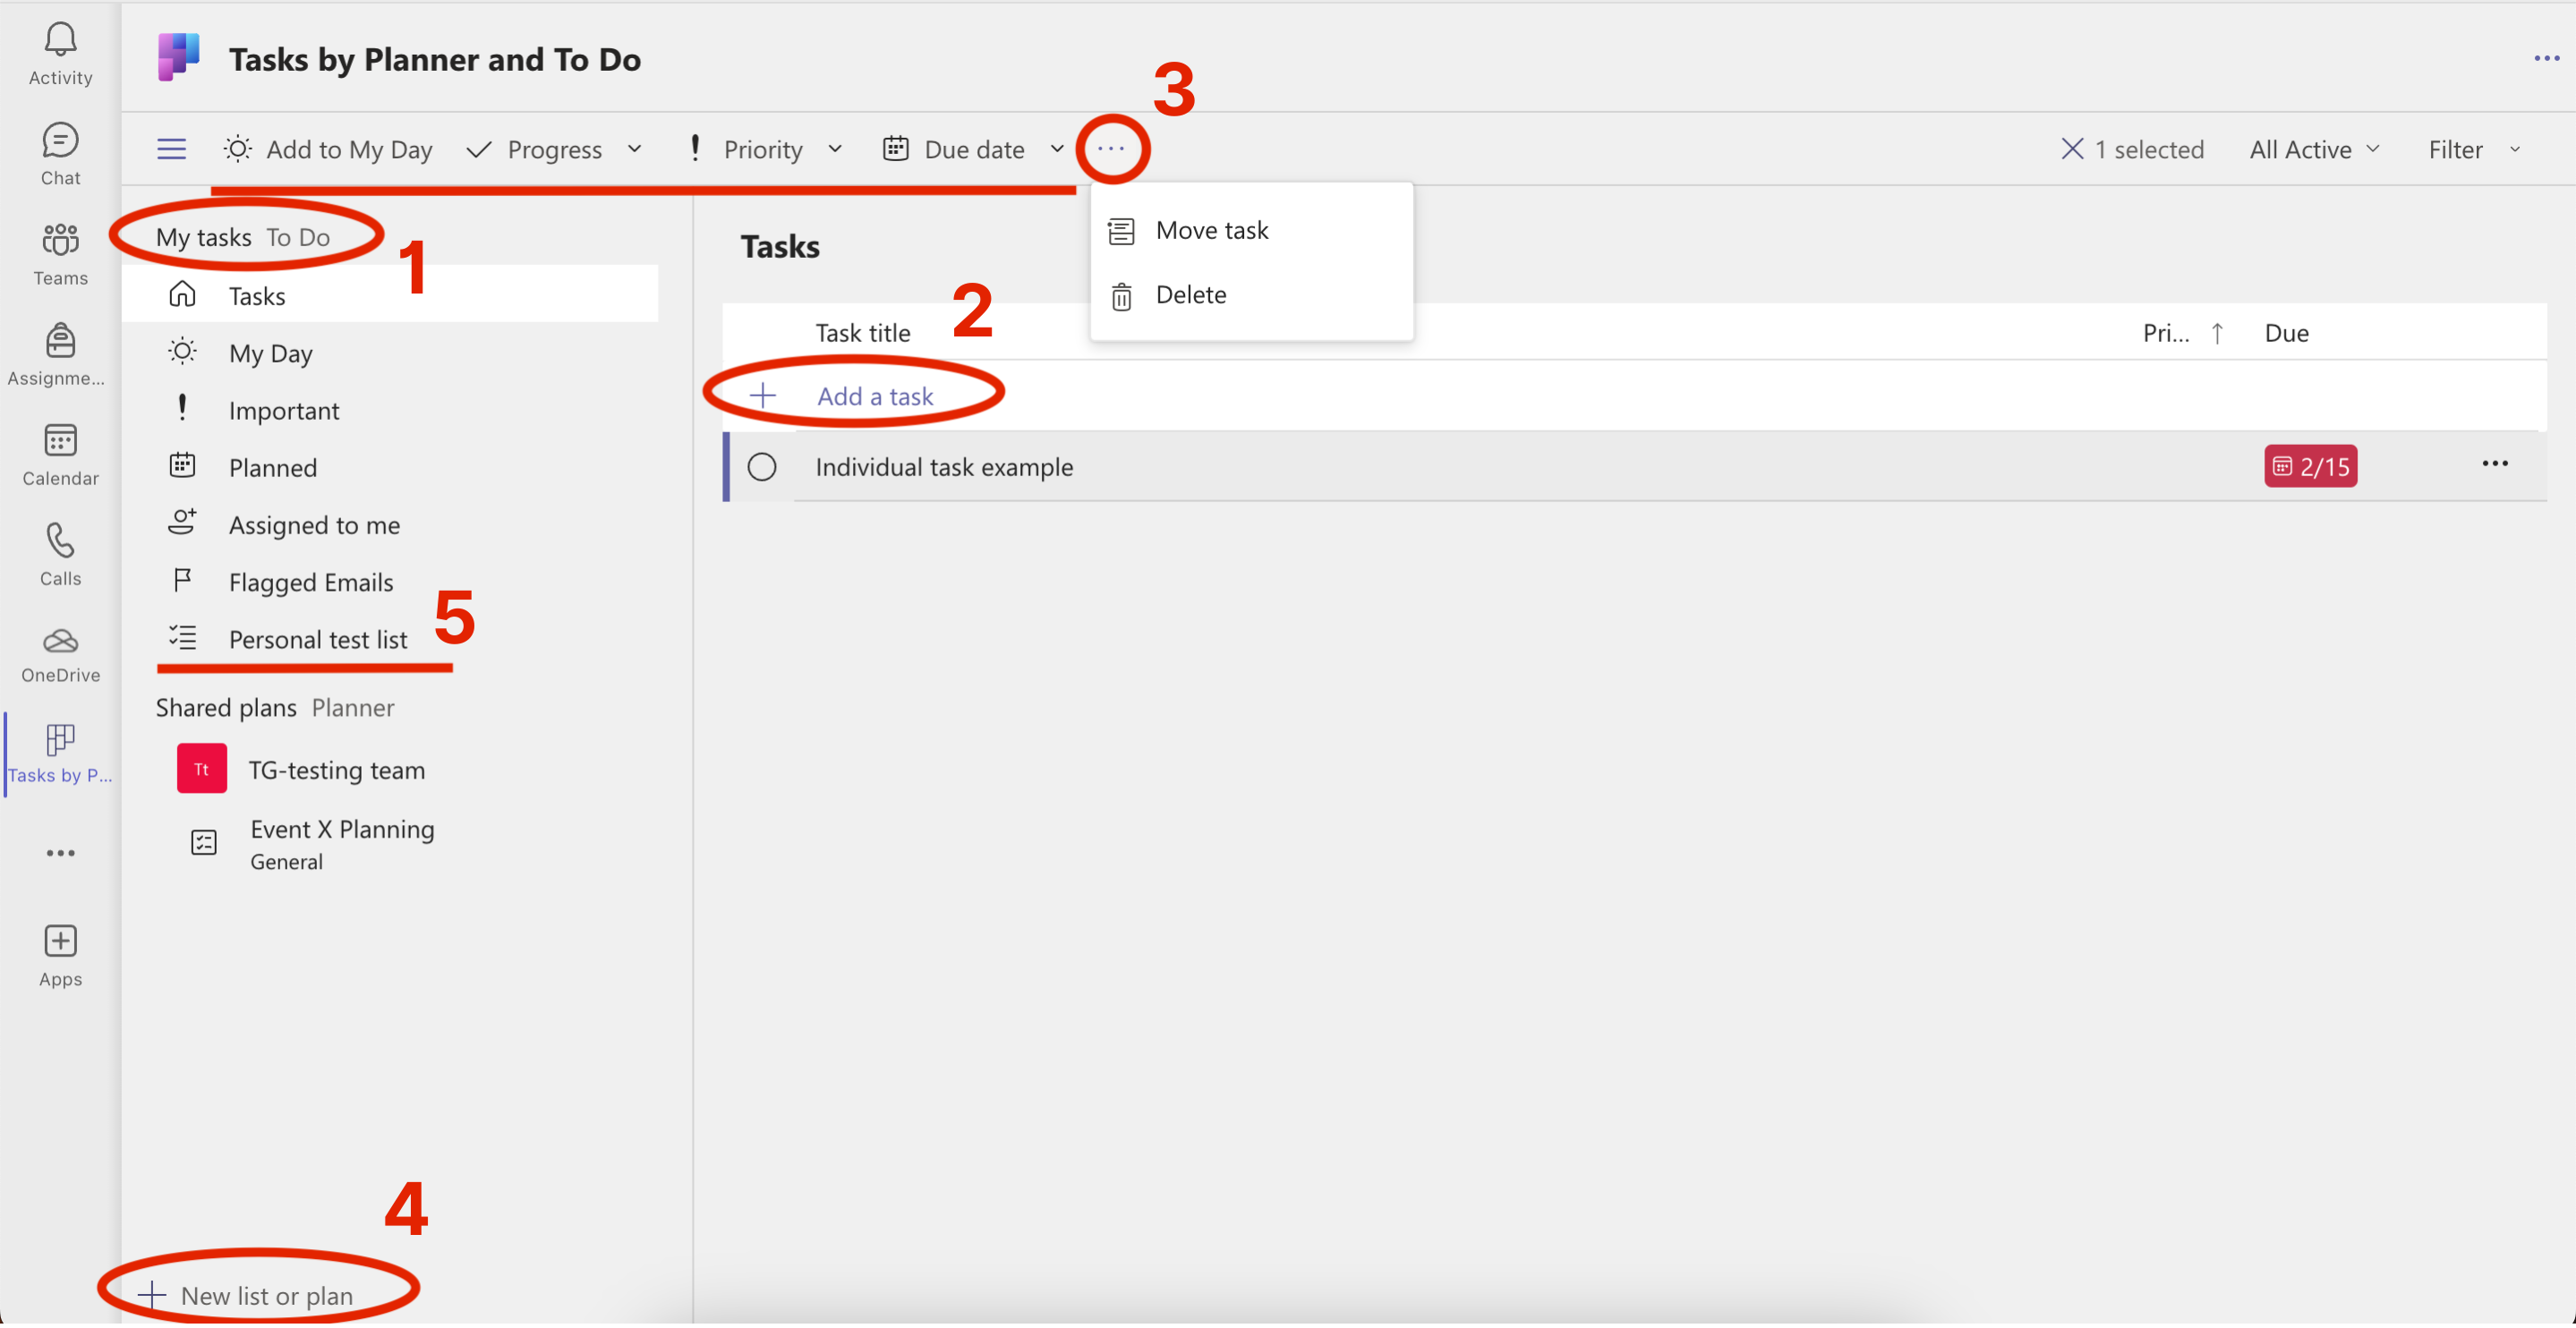
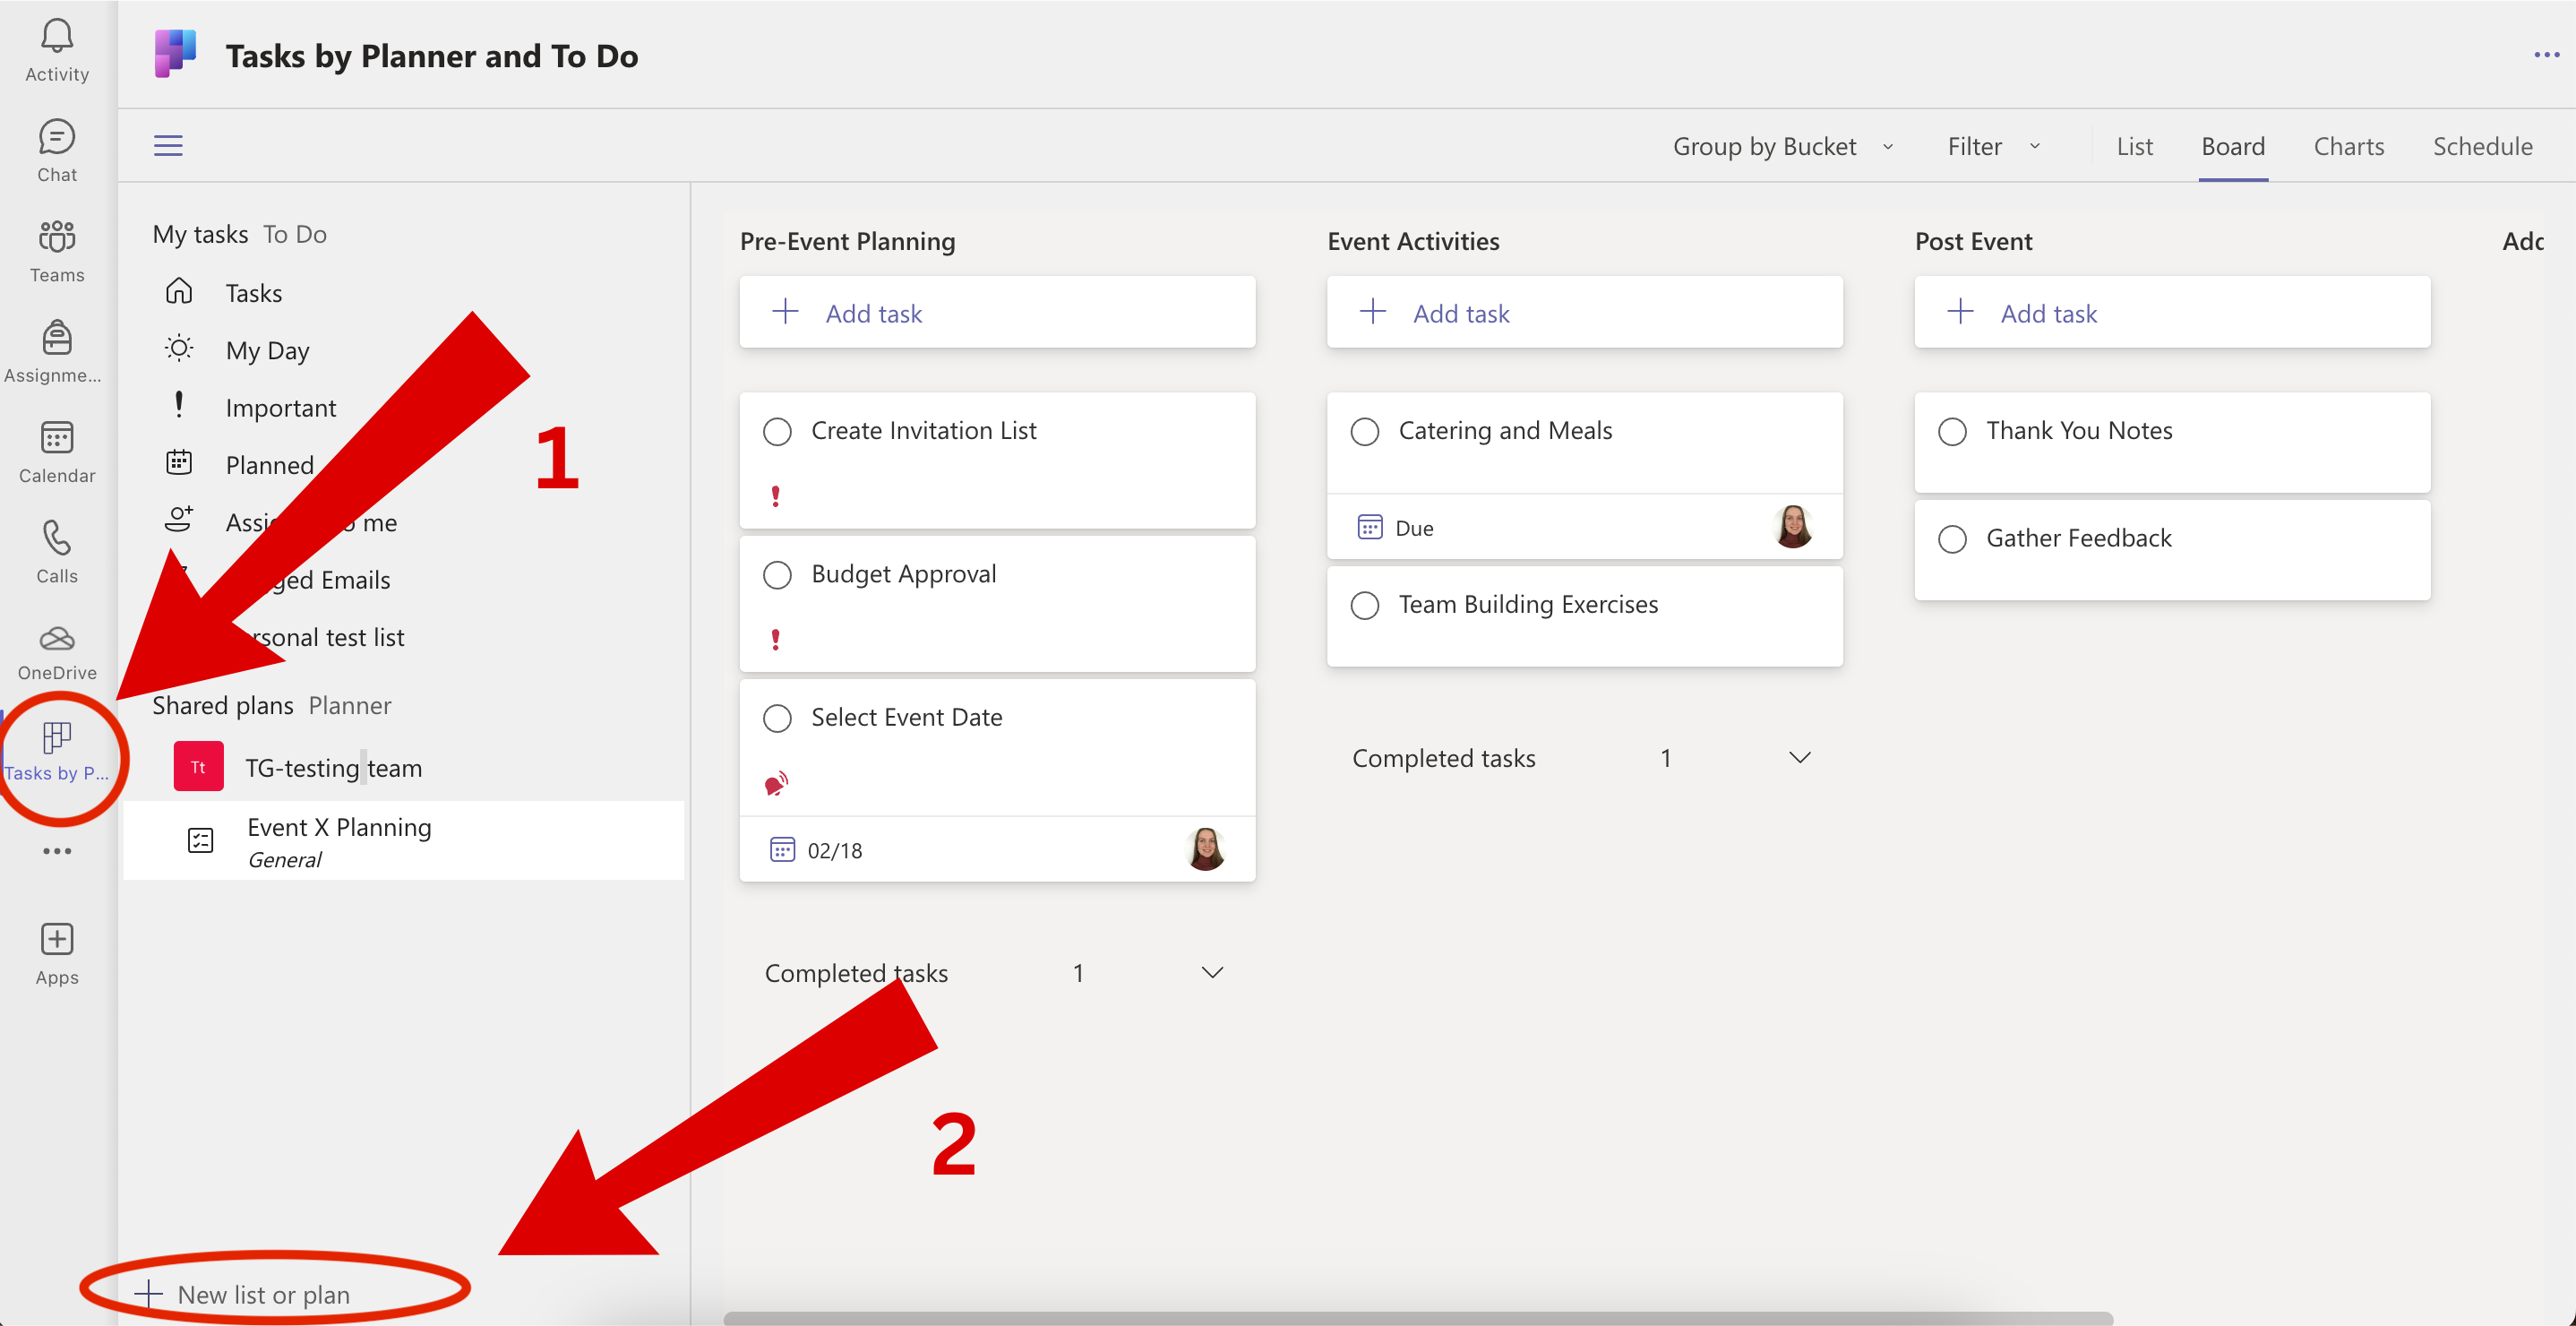
Let’s dissect the picture below to view the most important aspects of personal action items in the Tasks by Planner and To Do (later: Tasks) app.
Each step in the text mirrors the corresponding number in the screenshot.
Step 1: All your individual tasks are listed under “My tasks”. Note:
Step 2: To assign a task to yourself that only you can see, simply click on “Add a task”.
Step 3: Click on any task(s) — anywhere but the task name or empty circle — and a menu for editing options will appear. Now you can add a due date, delete the task(s), and more.
Step 4: To create a new folder or list for a group of your individual tasks, select “New list or plan”. Then, make sure “My tasks” appears in the “Create in” dropdown menu.
Step 5: After creating a new list, you can see it appear under “My tasks”. Whatever tasks you add in this list will not appear in the default list “Tasks”.
Whenever you’re done with a task, mark it done by simply clicking on the empty circle on the left side of the task name.
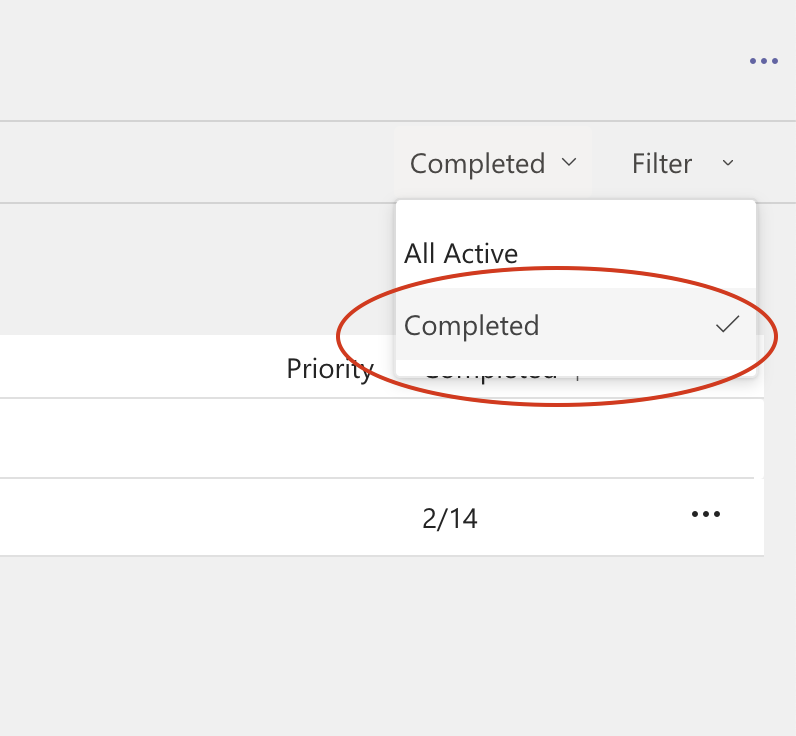
If you accidentally ticked the circle but didn’t want it to disappear, navigate to the upper right corner of the screen, click on “AllActive”, and then choose “Completed”. This will show you all the tasks that are marked complete.
Tasks vs. To Do
So far you’ve seen how to create individual tasks inside the Tasks app integrated in Microsoft Teams. But you might be wondering if it’s better to use the original, separate To Do app for your personal action items.
There aren’t many differences between Tasks and To Do. I only noticed a few.
How Tasks might be better is that it allows you to edit many tasks at the same time. For example, you can set the same priority or due date for them. To Do doesn’t allow this kind of bulk edit.
- How to bulk edit in the Tasks app: hold Ctrl (or Cmd on a Mac) while clicking on any part of the rectangular area designated for each task, except the name or empty circle, to select several at once.
How To Do might be better is that you can set tasks to repeat at any interval. To Do also gives you the option to add files to your individual tasks. Neither of these is an option in MS Teams’ Tasks app.
Remember, though, that you can use both Tasks and To Do! Either way, the action items you create will be synced to both platforms.
Teamwide Action Items
In Teams, there are two different ways to access action items for your team: either through the Teams or the Tasks by Planner and To Do menu item on the left side navigation bar.
In both locations, you can view, create and edit teamwide action items.
Below is a step-by-step guide for both options on how to get started, starting with the Teams path.
Option 1: Open “Teams” in the Navigation Bar
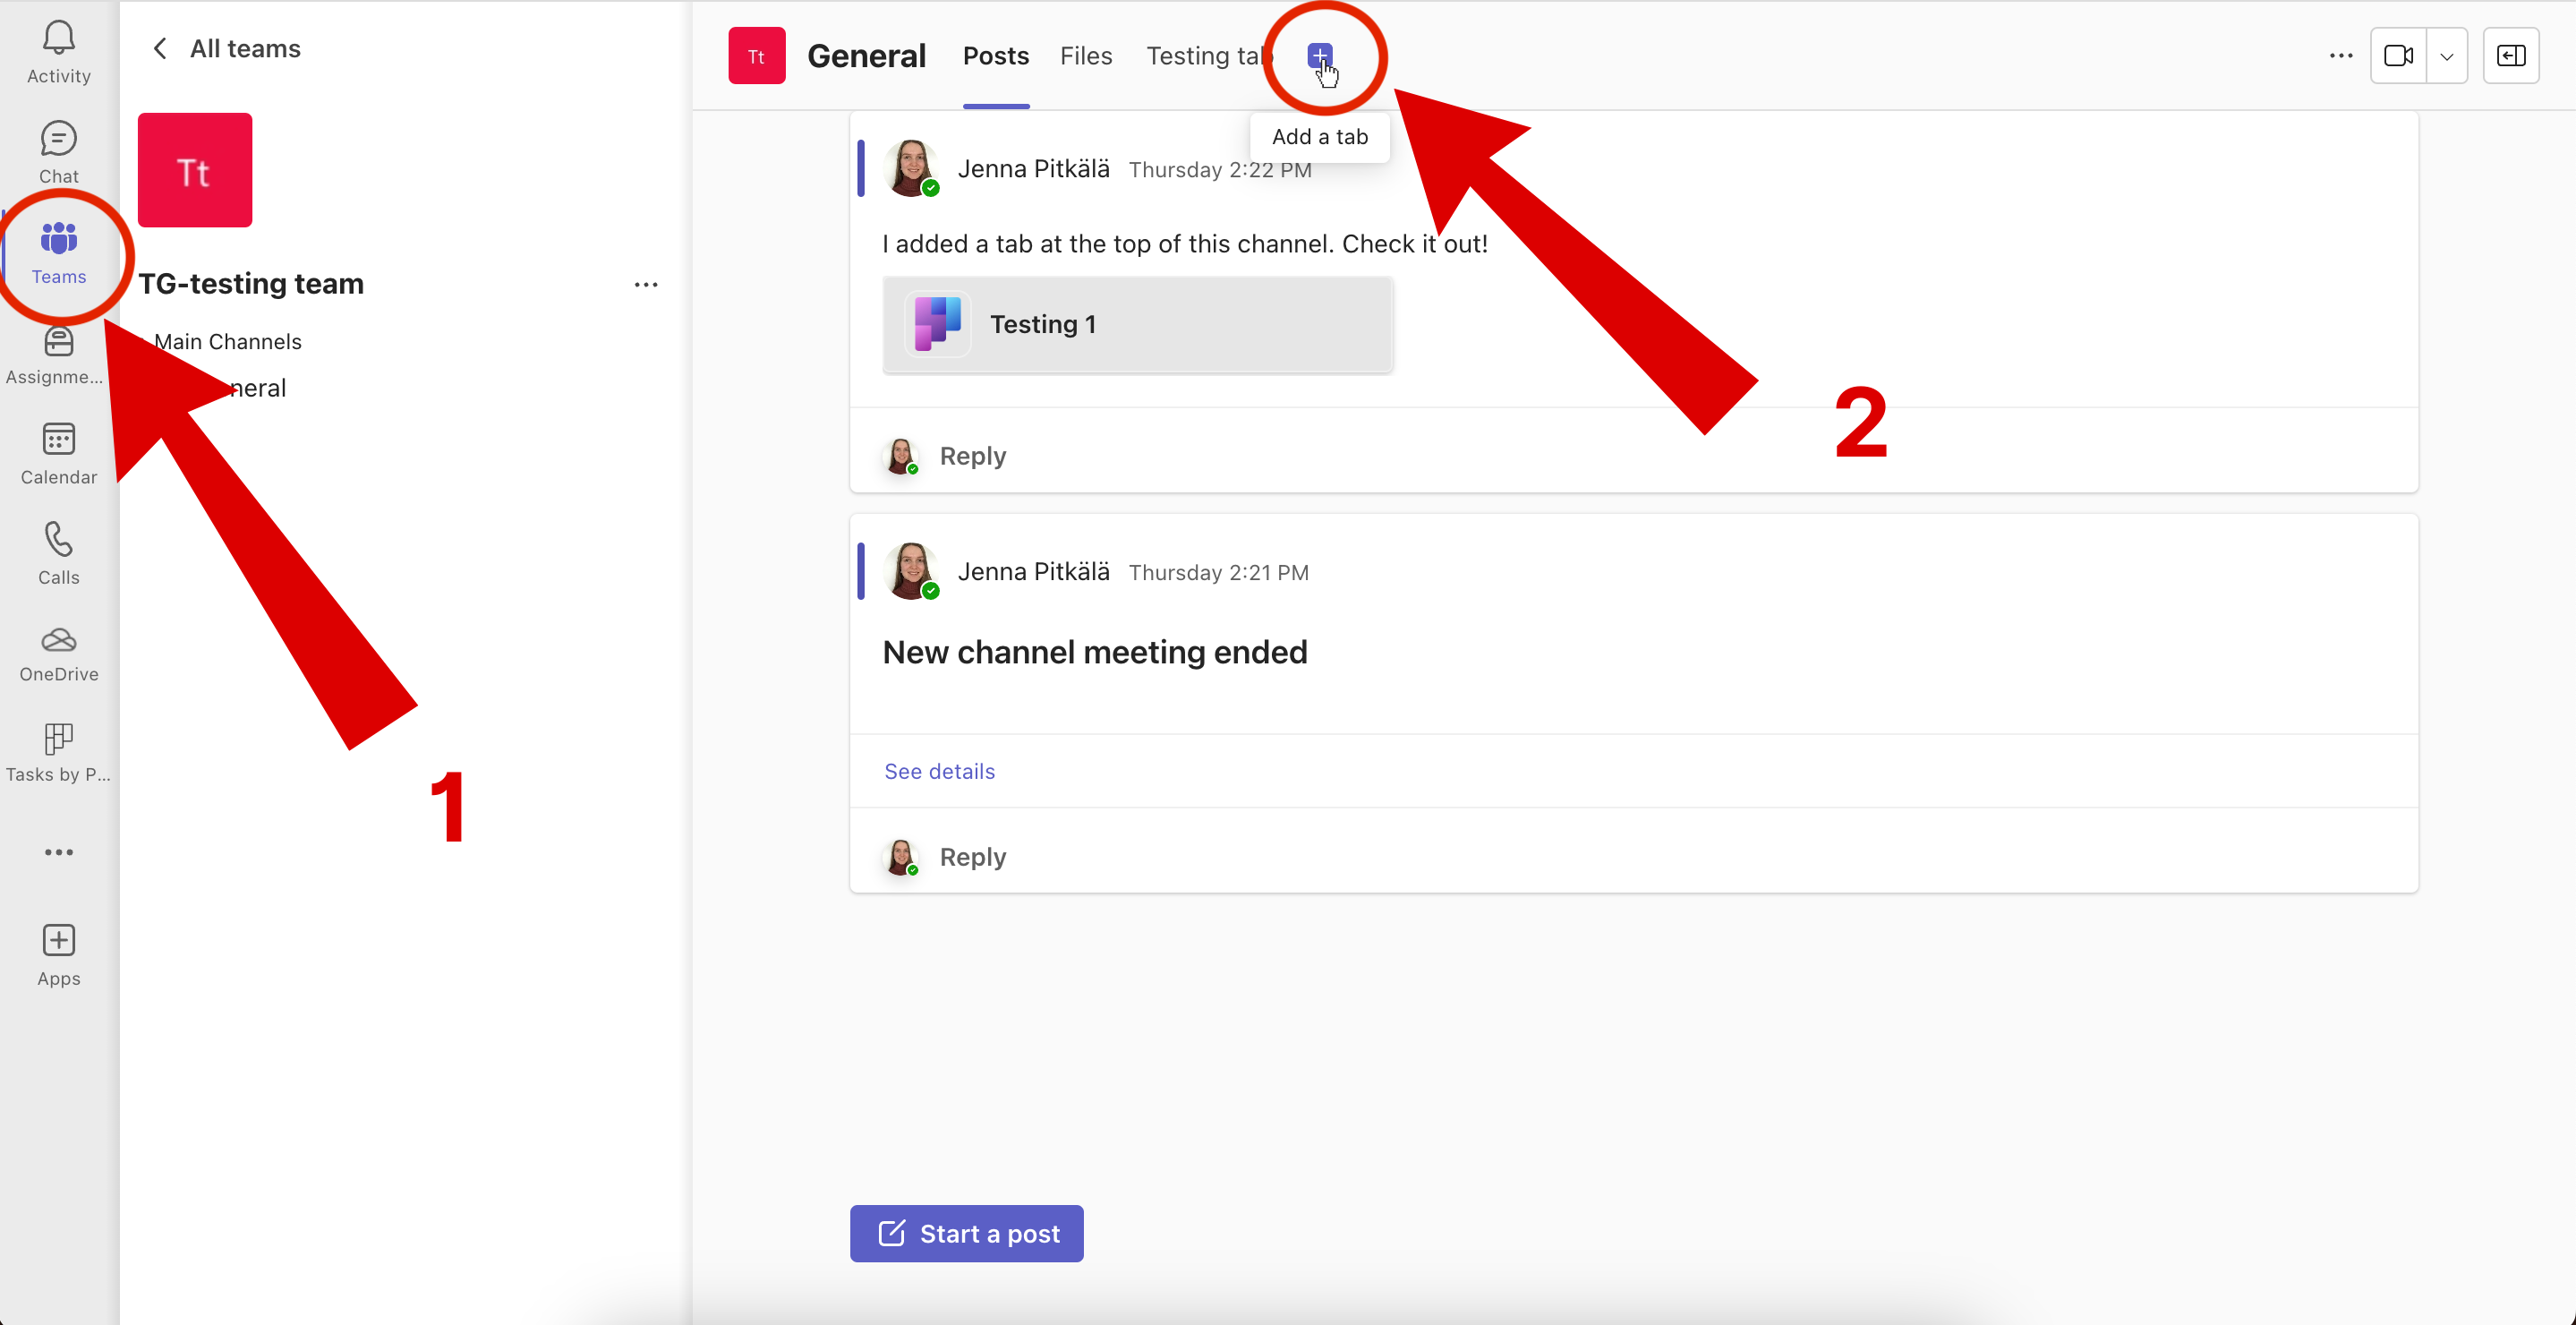
Step 1: Click on the Teams page on the left side menu.
Step 2: If you want to create a whole new project (plan) with new action items associated with it, click on the plus symbol to “Add a tab”. Instead, if you don’t need to create a new plan, skip this step.
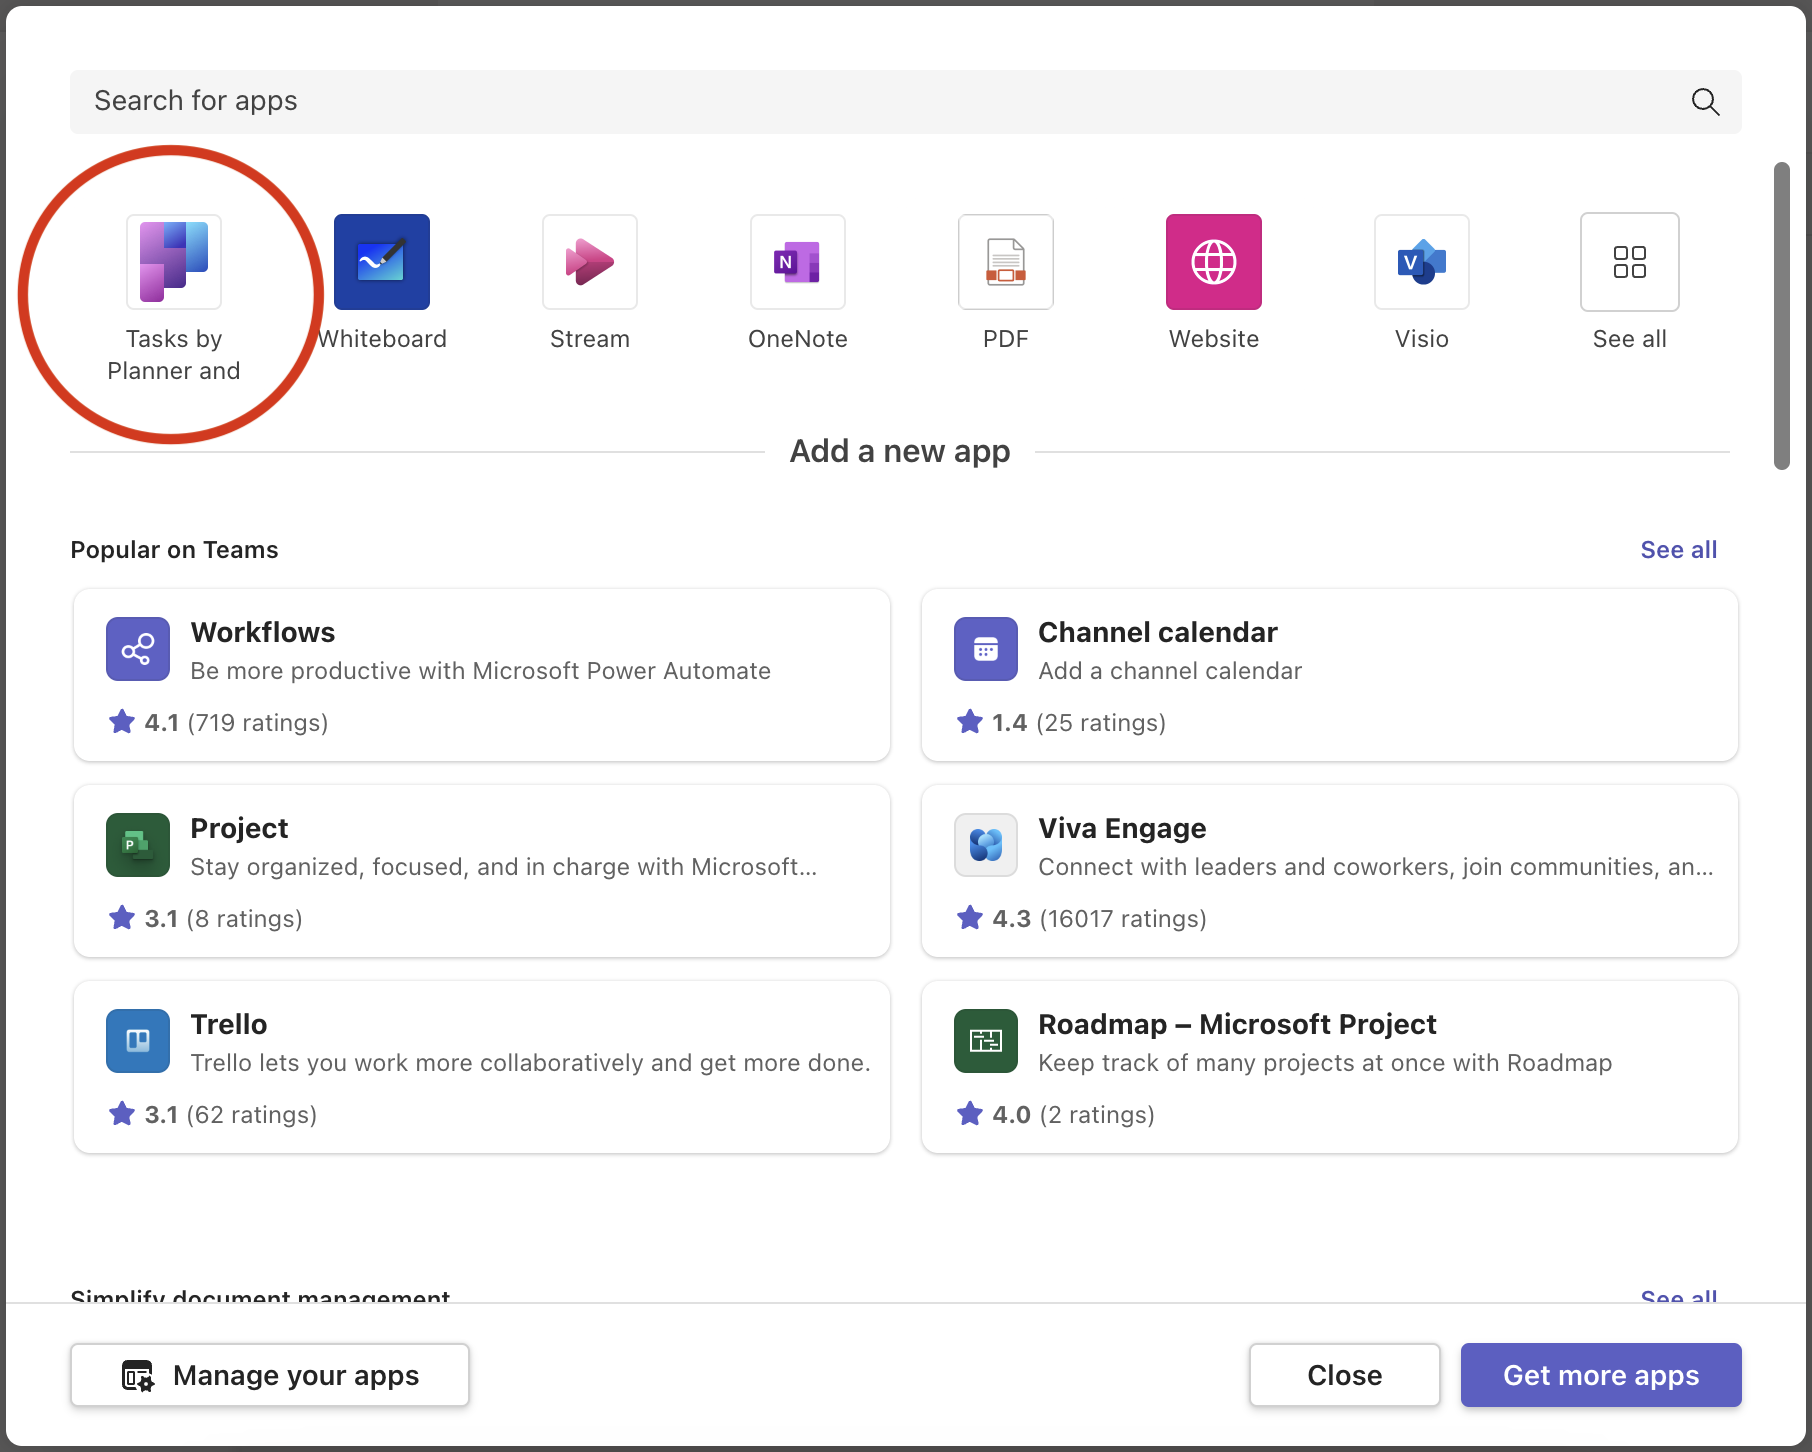
You will see the following view. If you can’t find the Tasks by Planner and To Do app immediately, type “tasks” in the search bar at the top, and you should see it. Click on the app.
After that, you can either create a new plan or choose to use an existing one for the team. Then, click “Save”.
Step 3: Create, view, edit or delete action items in your plan.
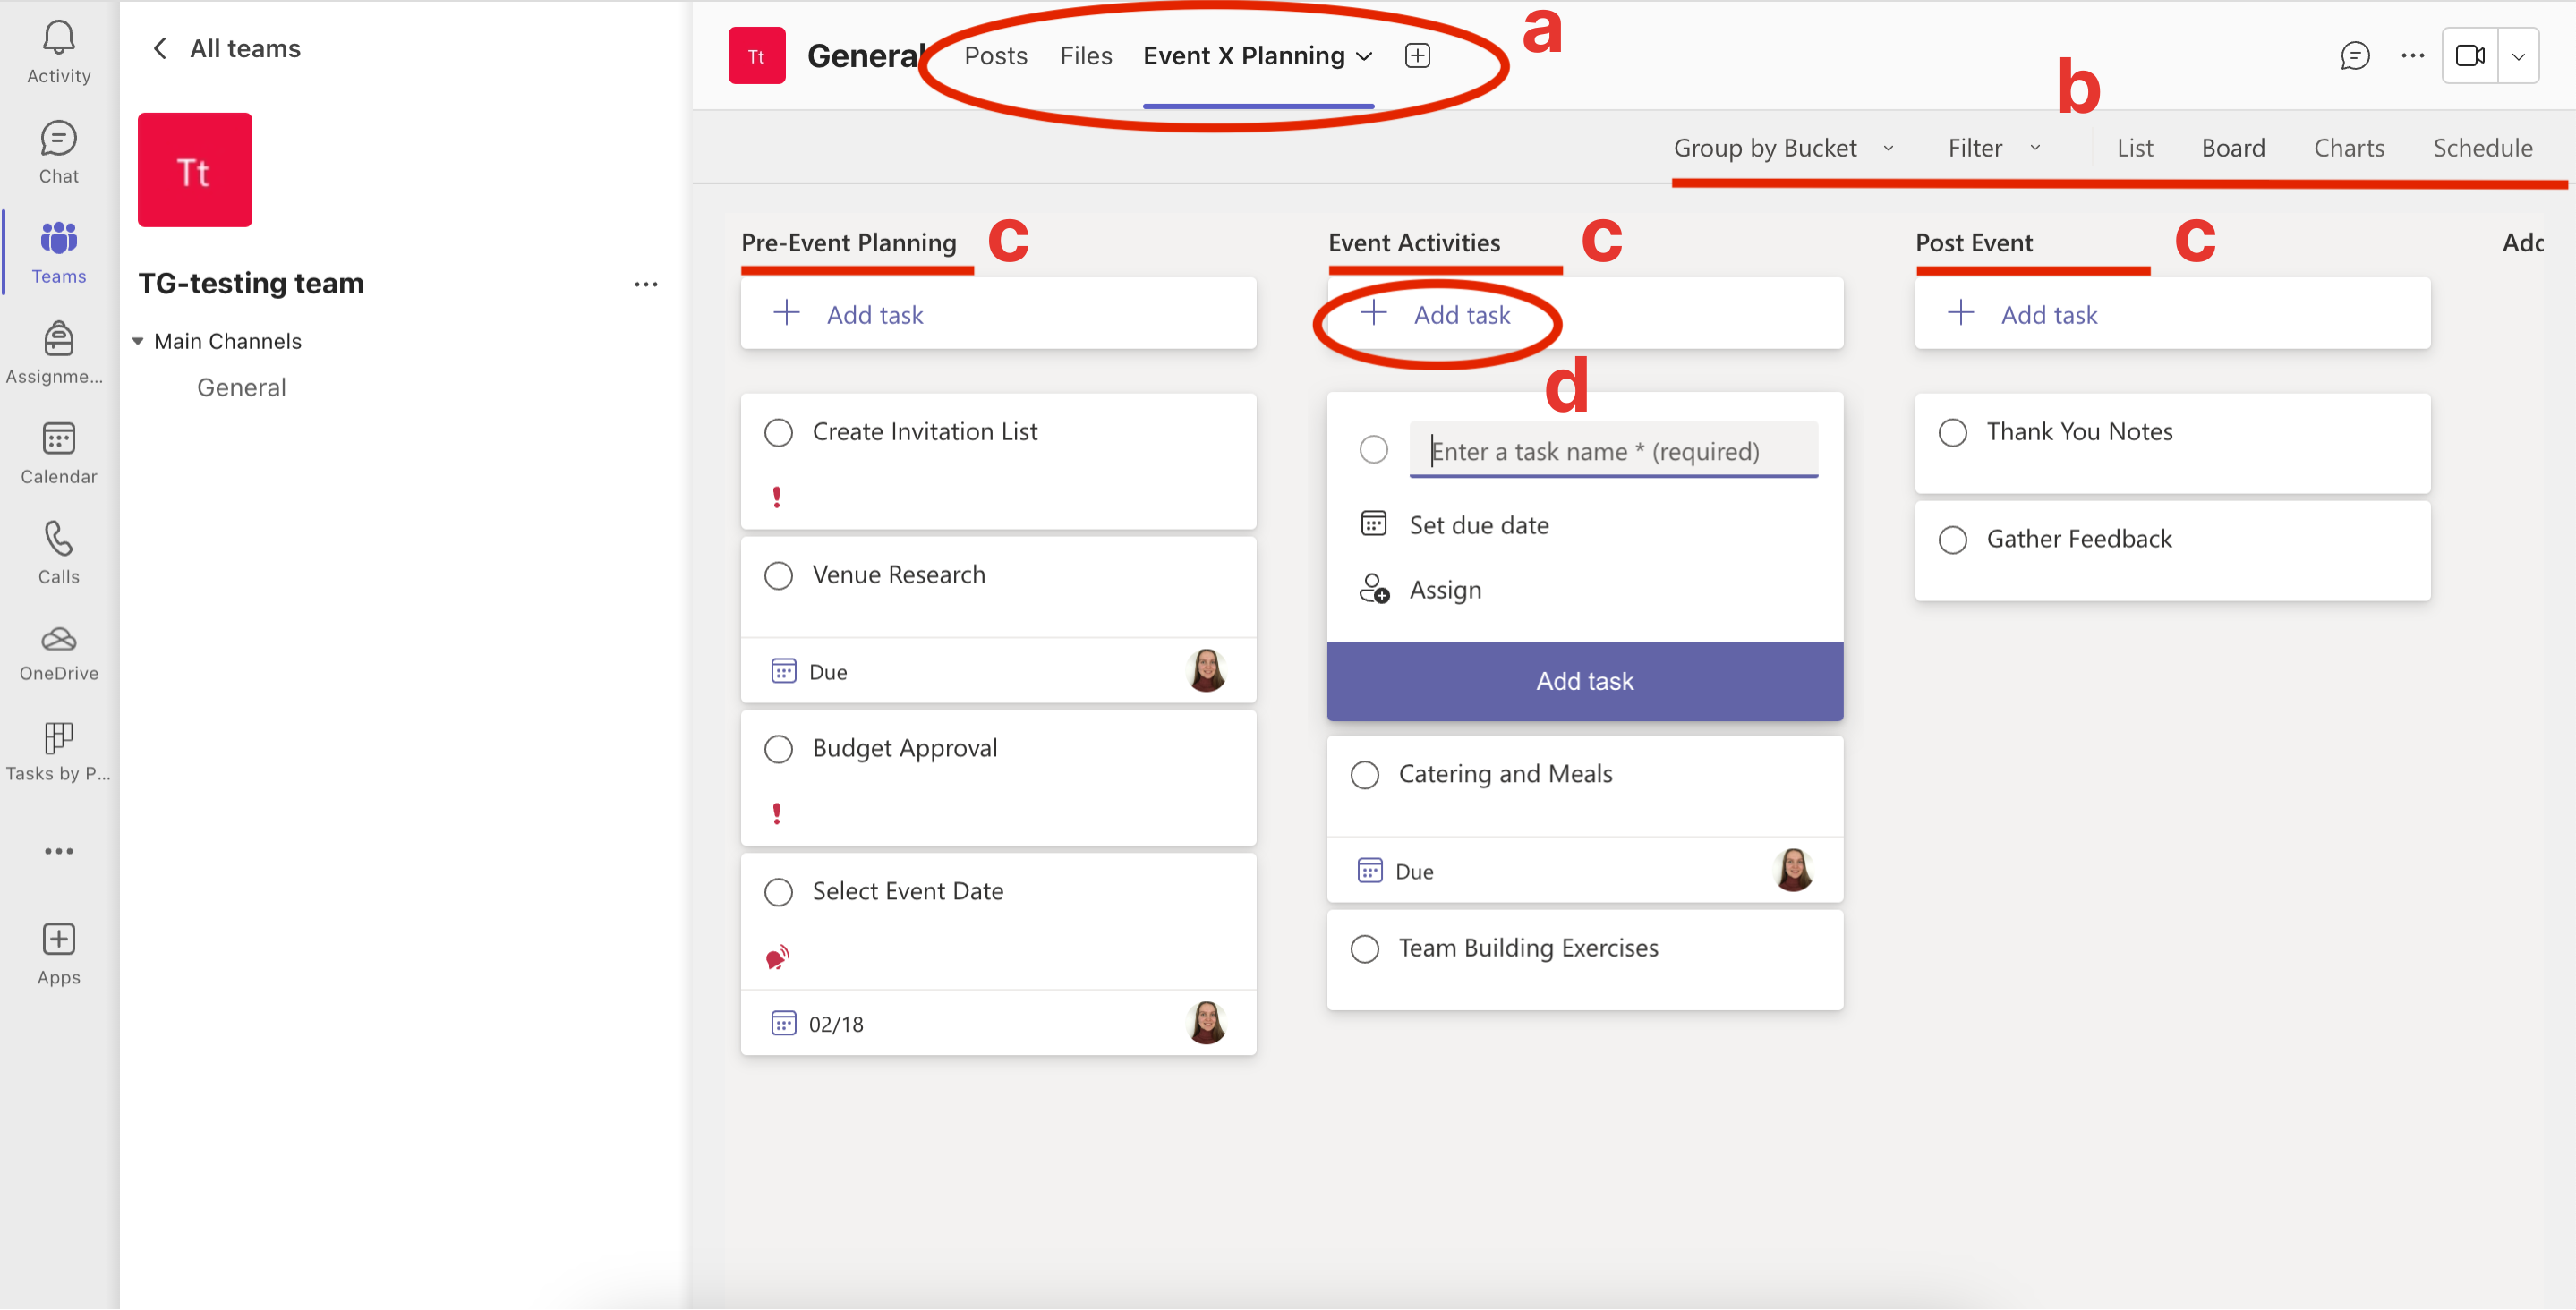
Let’s look at this example plan in the photo below called Event X Planning. You can see the name of this and other tabs on the top menu. Items like “Posts” and “Files” are also called tabs, but they are not plans, since their content is different. (a)
Below the top menu, to the right, there are multiple options to choose from when it comes to the layout of the tasks. You can either view the tasks in the current “Board” page, or you can switch to a simple list format, chart, or schedule page. You can also change how you want to filter or group all the tasks in the plan. (b)
In this example team plan, there are three buckets AKA task lists, categorized by when they’re occurring in relation to the event; “Pre-Event Planning”, “Event Activities”, and “Post Event”. Note that you and your team can name and organize your plan’s tasks however you like. (c)
Under each bucket, there’s a button for adding a new task. Click on that, and you’ll be able to name a new task, in addition to setting a due date and an assignee for it. Finish this action by clicking on “Add task”. (d)
You can also edit tasks later on. Simply click on any task and fill in the information you want.
You will be able to set a priority, add attachments, and more. Find more things to do by pressing the three dots in the top right corner, or by scrolling down.
If you comment on any task, the people who are working on the same task will get notified.

Option 2: Open “Tasks by P…” in the Navigation Bar
Step 1: Click on the Tasks by Planner and To Do app icon on the left side menu.
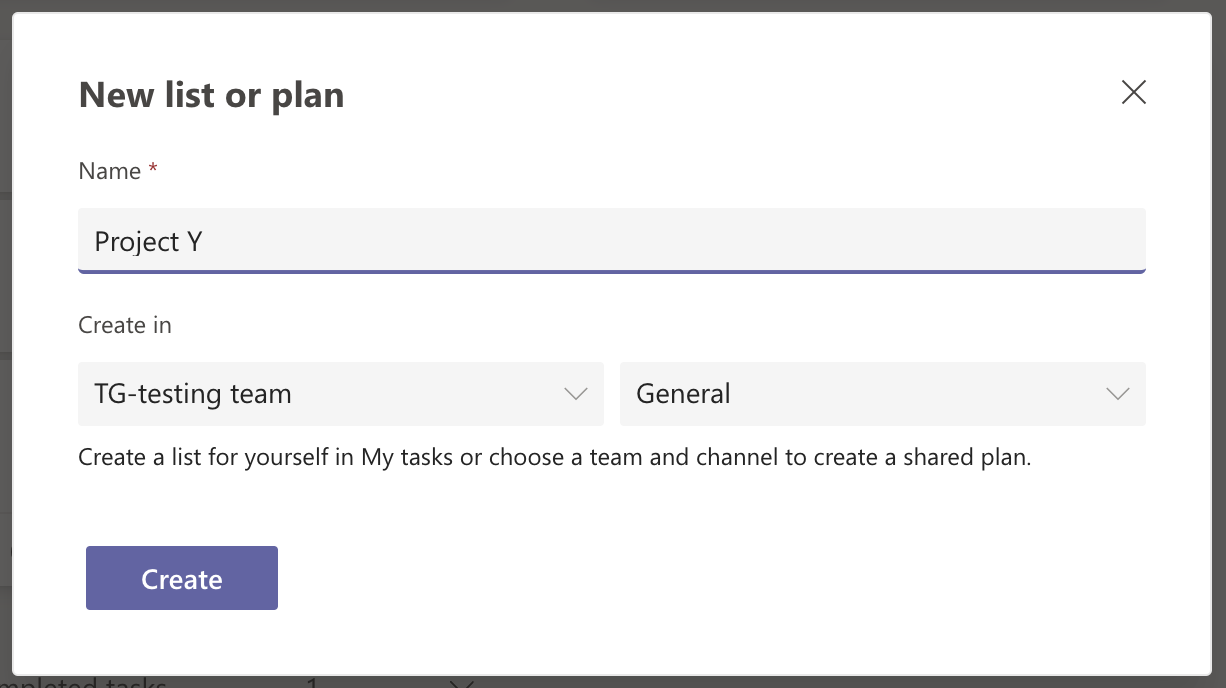
Step 2: If you want to create a new team plan, click on “New list or plan” in the bottom left corner. Instead, if you want to add tasks (AKA action items) to existing plans, you don’t need to create a new one and you can skip this step.
When creating a new plan, name it and choose its destination.
Step 3: Create, view, edit or delete action items in your plan.
Just like in Option 1, when we navigated to a team plan through “Teams” in the main left side menu, we’re now presented with all the tasks related to the plan we chose. However, by default, we’re seeing a list view. You can change the layout from the same place as previously. (a)
Here in the list view, double click a task to edit all its details in a new popup window. Alternatively, you can click on the task once and see the editing features in a new menu on the top. (b)
Note that now you can easily access all action items you’re a part of across different teams and plans in “Assigned to me”. (c)

If you select “Board” from the layout options, the view will be the same as in Option 1.

Tasks vs. Planner
So far you’ve seen how to create teamwide tasks inside the Tasks app integrated in Microsoft Teams. But you might be wondering if it’s better to use the original, separate Planner app for your team action items.
There aren’t many differences between Tasks and Planner. I only noticed a few.
How Tasks might be better is the fact that everything is in one place: your meeting calendar (which you can sync with your tasks) and action items for both your teams and yourself.
How Planner might be better is that you can set visually pleasing backgrounds for plans and analyze charts summarizing task progress across different plans. Planner also allows you to permanently delete plans (In the Tasks app in MS Teams, you can only remove them out of sight but they won’t be deleted).
Remember, though, that you can use both the Tasks app within Teams and Planner! Either way, the action items you create will be synced to both platforms.
Bonus Tips for Task Management in MS Teams
Effective use of action items in Microsoft Teams can enhance clarity, accountability, and productivity across teams. Here are some more technical tips for creating and assigning actionable tasks.
If you want to know more about what good quality action items look like, take a look at this blog:
(1) Create Action Items in Chat
Either during or outside a MS Teams meeting, you can create personal or teamwide tasks directly in the meeting chat like this:
- Hover over any message in the chat window and click on the ellipses (...) to open the menu
- In the menu, select More actions
- Click Create task
- Fill in more details and the place where the task goes. Then, click Add Task
(2) Avoid Information Overload
- @mention colleagues in task comments or channel conversations to instantly notify them of important updates. No need for long email threads.
- Create private channels to discuss sensitive action items with smaller working groups. Manage permissions to control access.
- Customize notifications in Teams to limit distractions and stay focused on relevant tasks.
- Synchronize tasks with your calendar to see deadlines more clearly
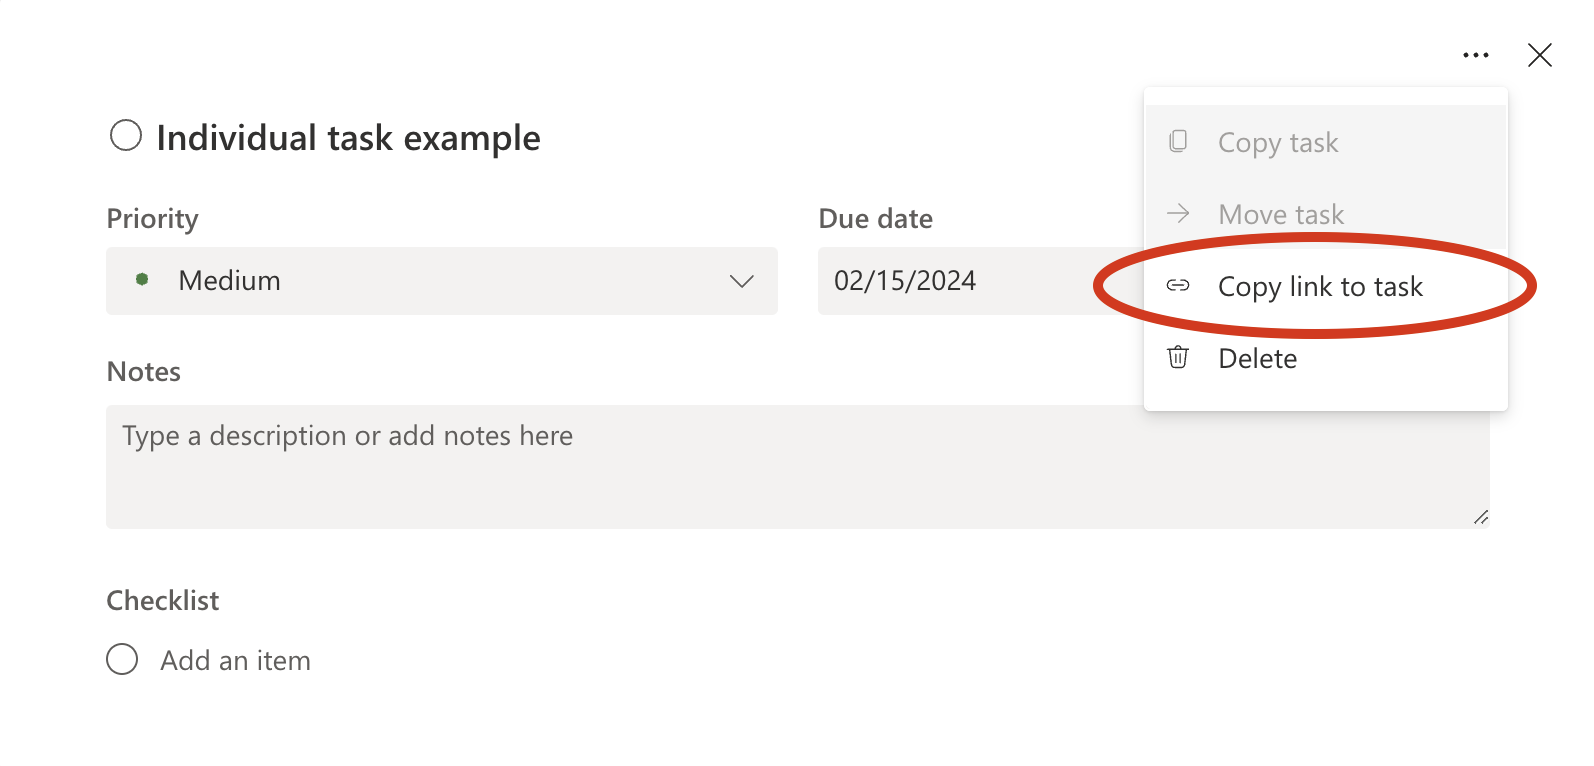
(3) Share Exact Tasks Quickly
Open any task, press the three dots, and click “Copy link to task".
(4) Keep Your Lists Organized
To keep your Teams action items list clean:
- Delete completed tasks regularly
- Consolidate or divide task buckets as needed
- Re-assign stale tasks to the appropriate owners
- Set reminders for upcoming and overdue tasks
(5) Assign Notetaker for Meetings
Wouldn’t it be great if someone else wrote action items for you? You’d be left with just having to share the task with others without having to recall details from the meeting.
Wudpecker can do that for you. It records audio from your meetings and generates a summary with action items in no time with AI.
.svg)


_.png)


.png)
.png)


.png)


.svg)
